Wednesday, December 28, 2011

Penne with Shrimp and Herbed Cream Sauce

David and I decided to cook Christmas Eve dinner for the family this year. We wanted something simple but with a lot of flavor. I found a recipe by Giada De Laurentilis on the Food Network website for Penne with Shrimp and Herbed Cream Sauce. Below is the recipe:


Ingredients:
1 pound penne pasta
1/4 cup olive oil
1 pound medium shrimp, peeled, and deveined
4 cloves garlic, minced
1/2 teaspoon kosher salt
1/2 teaspoon freshly ground black pepper
1 (15 oz) can whole tomatoes, drained, roughly chopped
1/2 cup chopped fresh basil leaves
1/2 cup chopped fresh flat-leaf parsley
1/4 teaspoon crushed red pepper flakes
1 cup white wine
1/3 cup clam juice
3/4 cup heavy whipping cream
1/2 cup grated parmesan


Directions:
1. Bring a large pot of slated water to a boil over high heat. Add the pasta and cook until tender but still firm to the bite, stirring occasionally, about 8 to 10 minutes. Drain the pasta and set aside.


2. In a large skillet, heat the oil over medium-high heat. Add the shrimp, garlic, 1/2 teaspoon of salt, and 1/2 teaspoon of pepper. Cook, stirring frequently until the shrimp turns pink and is cooked thoroughly, about 3 minutes. Using a slotted spoon remove the shrimp and set aside.


3. Add the tomatoes, 1/2 cup basil, 1/4 cup parsley, and the red pepper flakes. Cook for 2 minutes, stirring constantly. Add the wine, clam juice, and heavy cream. Bring the mixture to a boil. Reduce the heat to medium-low and simmer for 7-8 minutes until the sauce thickens. Add 1/4 cup Parmesan, the cooked shrimp, the cooked pasta, and the remaining herbs. Toss together until all ingredients are coated.


4. Transfer the pasta to a large serving bowl. Sprinkle with the remaining cheese and serve immediately.


The meal came together very quickly and was delicious. We will definitely be making it again!

NOTE:
- You can replace the heavy whipping cream with milk to make it less fattening.
- If the sauce does not thicken you can add a teaspoon of corn starch to aid the process.

Tuesday, December 27, 2011

Zebra

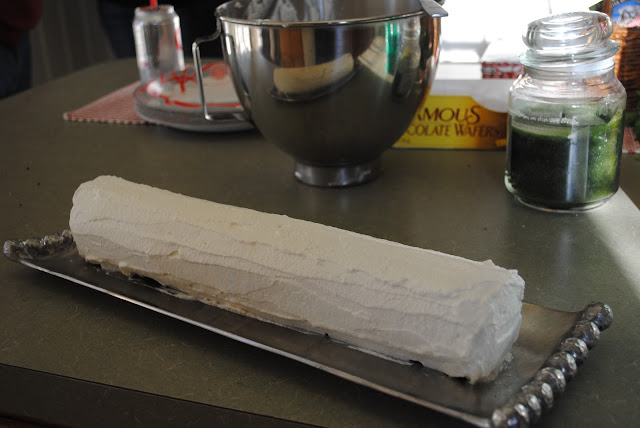
One of our family Buchanan classic recipes is called zebra. It is one of the most simple but delicious deserts! Below is our classic family recipe:

Ingredients:
2 cups heavy cream
2 tbsp sugar
1 tsp vanilla extract
19-oz package Nabisco Famous Chocolate Wafers


Directions:
1. Whip cream, slowly add sugar and vanilla.


2. Continue whipping until stiff peaks form. Do not over whip or it will begin to fall.


3. Spread one-half tablespoon whipped cream on each wafer.


4. Begin stacking wafers together on end on a long serving platter to make a 14-inch log.


5. Frost with remaining whipped cream.


6. Refrigerate for 4-6 hours. Slice at a 45 degree angle so each serving shows the chocolate and white layers.

Enjoy!


Friday, December 23, 2011

Ginger Snap Cookies

After yesterdays cookie disaster I knew I had to try again. I have never made gingersnaps before but a coworker brought them to work and they were delicious. Plus they are a lower calorie cookie so you don't have to feel bad about eating it! Below is the gingersnap recipe I used that produced a softer gingersnap which actually looked and tasted like it should! Phew....I haven't lost my baking touch.

Ingredients:
2 cups flour
2 tsp baking soda
1/2 tsp salt
1 tbsp ground ginger
1 tsp ground cinnamon
3/4 cup shortening
1 c sugar
1/4 c molasses
1 egg
Additional sugar for rolling


The most important ingredients

Directions:
1. Preheat oven to 350°F.
2. Mix flour, baking soda, salt and spices in medium bowl. Set aside.


3. Beat shortening and sugar in large bowl with electric mixer on medium speed until light and fluffy. Beat in molasses and egg.


4. Gradually stir in flour mixture until well mixed.


5. Shape dough into 1-inch balls. Roll in additional sugar to coat. Place 2 inches apart on ungreased baking sheets.


6. Bake 12 minutes. Cool on baking sheets 1 minute. Remove to wire racks; cool completely. Store in airtight container.


I am so happy the cookies turned out well! After yesterday I needed this to work! I hope you enjoy the recipe!


Thursday, December 22, 2011

Almond Oat Lace Cookies

I decided I have had enough chocolate chip cookies and should try something new this Christmas. So I stumbled upon the Almond-Oat Lace Cookies in Food and Wine Magazine. I should have known better than to attempt a cookie in a gourmet magazine but I tried anyways. While this recipe seemed easy enough I turned out with Almond-Oat Sticks instead of cookies. But if there is one thing this year has taught me it is that you cannot control everything and when life gives you lemons make lemonade. Below is the recipe and the not so perfect desert I turned out with!

Ingredients: (For 24 cookies, I doubled the recipe when I made it)
1/2 cup whole natural unsalted almond with skins
2 tbsp old-fashioned oats
6 tbsp unsalted butter
6 tbsp superfine sugar
2 tbsp light brown packed sugar
1 1/2 tsp honey
1 tbsp all-purpose flour
1/4 tsp kosher salt
4 oz bittersweet chocolate melted


 Directions:
1. Arrange racks in lower and upper thirds of oven. Preheat to 350 degrees. Line 2 baking sheets with parchment paper.

Correct Rack Placement
2. Pulse almonds and oats in a food processor until coarse meal forms. Set aside.

Before Pulsing

3. Melt butter in a medium saucepan over medium heat.
4. Add both sugars and honey; whisk until blended and sugar dissolves (1-2 minutes).
5. Remove from heat. Add nut mixture, flour, and salt; stir until well blended.


6. Spoon batter by 2 tsp portions onto baking sheets, spacing 2 1/2" apart. Using your fingertips, pat cookies down to 1/4" high rounds; push in any jagged edges to form smooth circles.

NOTE: This is where I started going wrong. These cookies are way too big! They ended up as a sheet of cookies. See below pictures of disaster!


7. Bake, rotating sheets after 6 minutes, until dark golden brown and cookies spread out into a thin layer, 10-12 minutes. Slide cookies onto wire rack.


This is what happens when you spoon too large of cookies onto baking sheet!

Trying to save my cookies.....

Deciding they shouldn't be cookies but snack size sticks

So I thought I had learned from my previous mistakes and made my cookies much smaller. Well the size worked well but this time my cookies were burnt. So make sure to watch the time when baking them as they burn very quickly.

On the left my burnt cookie!

8. Using a pastry brush, brush half of each cookie with melted chocolate. Let stand until the chocolate is set, about 2 hours.

NOTE: I decided not to brush the sticks but instead drizzled the sticks with chocolate.

Delicious Chocolate


My drizzled chocolate bars

So, while the end result was very different than what I originally intended to do they are still delicious. If you decide to make them and would like a few more tips please feel free to ask. I would love to apply what I learned during this cookie fiasco!


Tuesday, December 20, 2011

Snickerdoodles

Let the christmas baking begin! My first cookie of the christmas season is a simple but delicious one. Below is my snickerdoodle recipe.

Ingredients:
1/2 cup softened butter
1/2 cup shortening
1 1/2 cups white sugar
2 eggs
2 tsp vanilla extract
2 3/4 cups all purpose flour
2 tsp baking powder
1 tsp baking soda
1/4 teaspoon salt

2 tblsp white sugar
2 tsp ground cinnamon


Directions:
1. Preheat oven to 375 degrees
2. Cream together butter, shortening, sugar, eggs, and the vanilla.


3. Blend in the flour, baking powder, baking soda, and salt.


4. Mix in the 2 tbls white sugar with 2 tsp ground cinnamon in a small seperate bowl.


5. Roll 1.5 inch bowls in the cinnamon and sugar mixture. Then place 2 in. apart on baking sheets.


6. Bake 10 minutes and remove immediatley from baking sheets.